
압축
Updated:
강의 사이트
- http://www.kocw.net/home/search/kemView.do?kemId=1148815
허프만 코딩
1. Huffman Coding
-
무손실이 필요한 압축 코딩에 사용
-
가령 6개의 문자 a, b, c, d, e, f로 이루어진 파일이 있다고 하자. 문자의 총 개수 는 100,000개이고 각 문자의 등장 횟수는 다음과 같다

-
frequency는 각 문자가 등장한 횟수
- 고정길이 코드를 사용하면 각각의 문자를 표현하기 위해서 3비트가 필요하다.
- 즉, fixed-length code의 길이가 3이라고 한다.
- 따라서 파일의 길이는 총 문자 개수 * 고정 비트 수 = 100,000개 * 3 = 300,000비트가 된다.
- 그러나 위 테이블의 가변길이 코드를 사용하면 224,000비트로 줄어든다.
- a의 경우 45000번 등장하는데 가변길이 0. 즉, 1비트로 표현하므로 45000.
- b의 경우 13000번 등장하는데 가변길이 101, 즉 3비트로 표현하므로 39000.
- f의 경우 5000번 등장하는데 가변길이 가 1100, 즉 4비트로 표현 20000 비트를 차지.
- 이런식으로 해서 다 더하면 대략 224000비트가 나옴
- 많이 줄어든 것을 볼 수 있다.
- 이때 variable length 코드는 아무렇게 선택하지 않는다. 디코딩을 고려해서 잘 만들어진 코드이다.
- 이것을 prefix code라고 한다.
2. Prefix Code
- 어떤 codeword도 다른 codeword의 prefix가 되지 않는 코드 (여기서 codeword란 하나의 문자에 부여된 이진코드를 말함)
- 모호함이 없이 decode가 가능함
- prefix code는 하나의 이진트리로 표현 가능함
- 왼쪽으로는 0, 오른쪽으로는 1을 부여
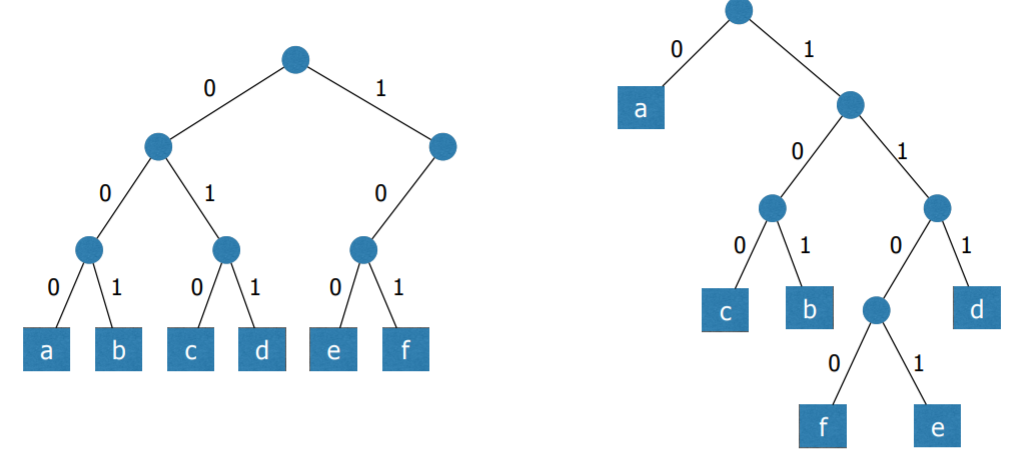
- 예를들어 baacd라고 하자
- 그러면 10100100111이 된다.
- 이를 decode한다면 처음 101의 경우 b밖에 없다. 진짜 맨처음 1, 10의 경우 해당사항이 없기 때문에 넘어간다.
- 101다음 0부터 시작하는데 0은 a가 있다. 또 다음에도 0이 나오므로 baa까지 decode가 된다.
- 그다음 1부터 시작하는데 1은 없으므로 다음 0을 읽는다. 10은 없으므로 또 0을 읽는다. 100은 c이므로 decode
- 이런 방식으로 마지막 111까지 d를 decode하면 된다.
- 즉, 모호함이 없이 decode가 가능하도록 하는 코드가 prefix 코드이다.
- 모든 문자(노드)들은 leaf 노드들이다. 즉, 모든 문자가 leaf 노드여야 prefix code라고 할 수 있다.
3. Huffman Coding
- 가장 짧게 압축되는 prefix Code를 찾는 알고리즘.
- 여러개의 prefix Code가 나올 수 있는데 어떤 방식이든 압축률은 같아진다.
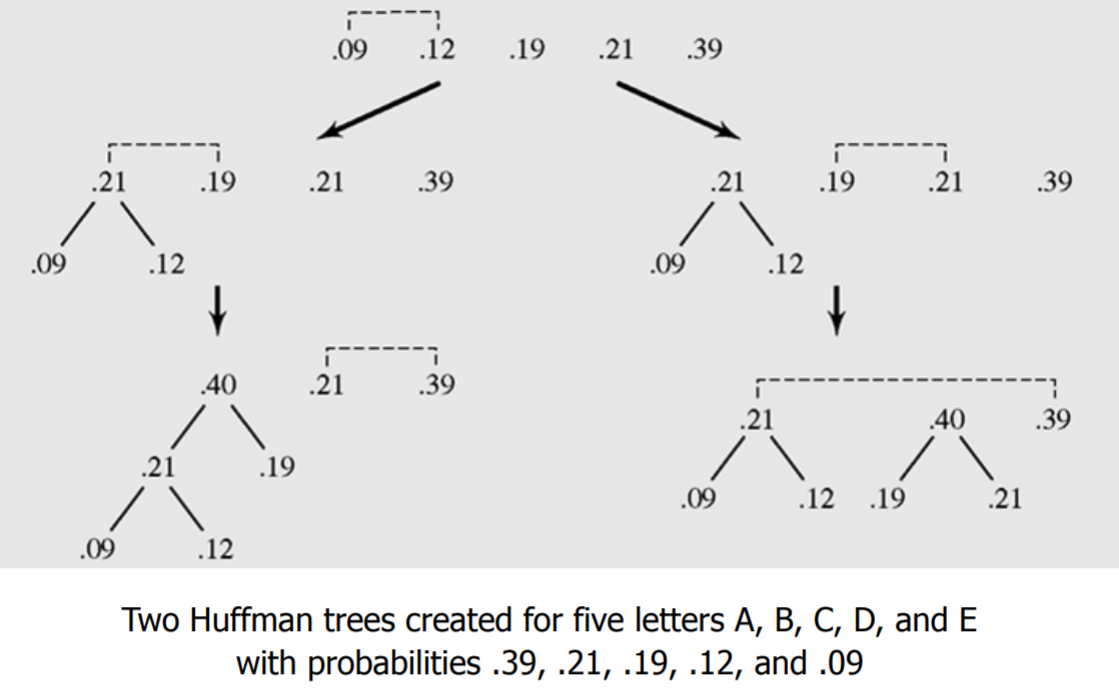
- 그림의 맨위 숫자들은 각 문자들이 파일에 얼마만큼 들어있는지에 대한 상대적 비율을 의미
- 맨처음에는 빈도수로 했으나 실제로는 이 비율을 사용
- 각 숫자들은 각자의 트리의 노드가 한개 있는 즉, 자신이 root노드이면서 한 개만 있는 트리들이라고 가정하다.
- 그럼 각 트리들의 root 들 중 처음 가장 작은 두 개인 9와 12를 더해서 21을 만들고 21을 부모노드로 한다.
- 그 다음 남은 트리의 root 노드들에서 21, 19, 21, 39 중 가장 작은 2개는 19와 21이다. 21은 두 개 있으므로 그림의 왼쪽과 오른쪽 두 가지의 경우가 생긴다.
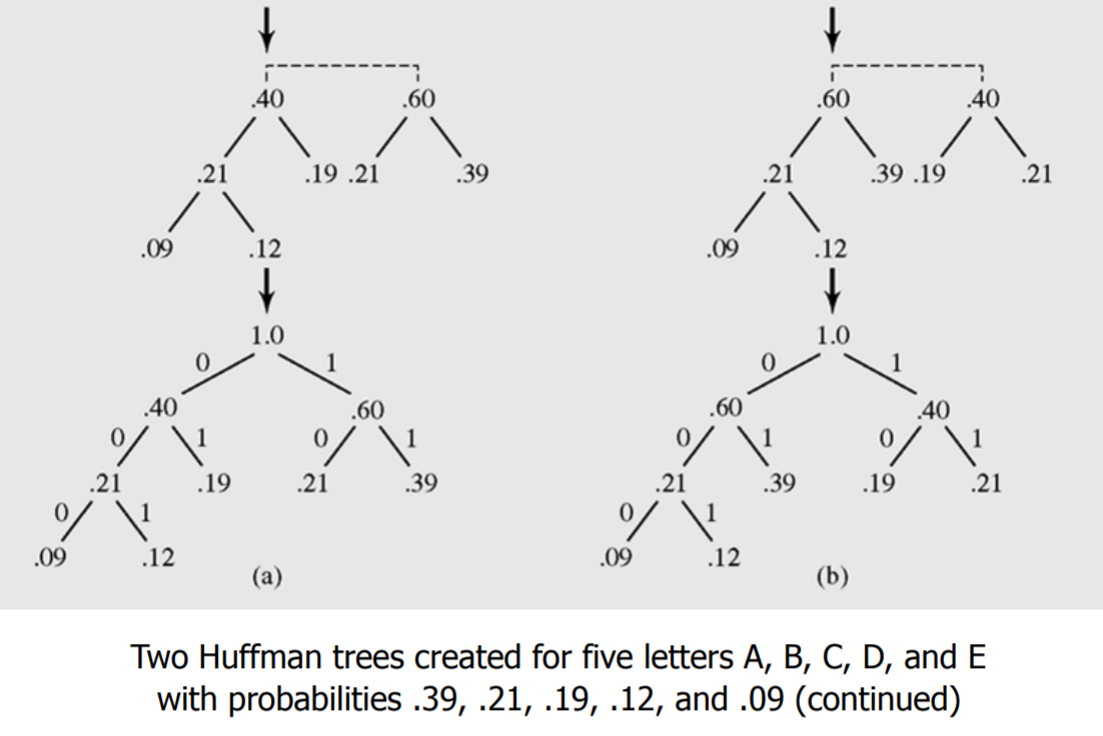
- 각 경우에 따라서 위처럼 반복하면 root가 100이 되는 하나의 트리가 생긴다.
- 위의 예제는 두 가지의 경우(트리)가 생길 것이다.
- 그러나 어차피 결과는 같다.
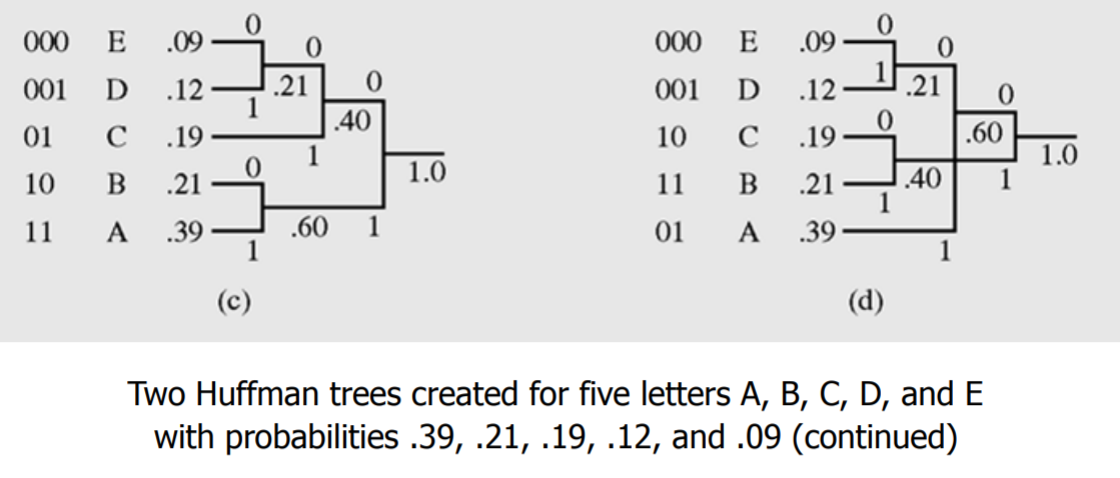
- 그래서 만들어 진 두 개의 트리는 결과 값이 같다는 것을 보여줌.
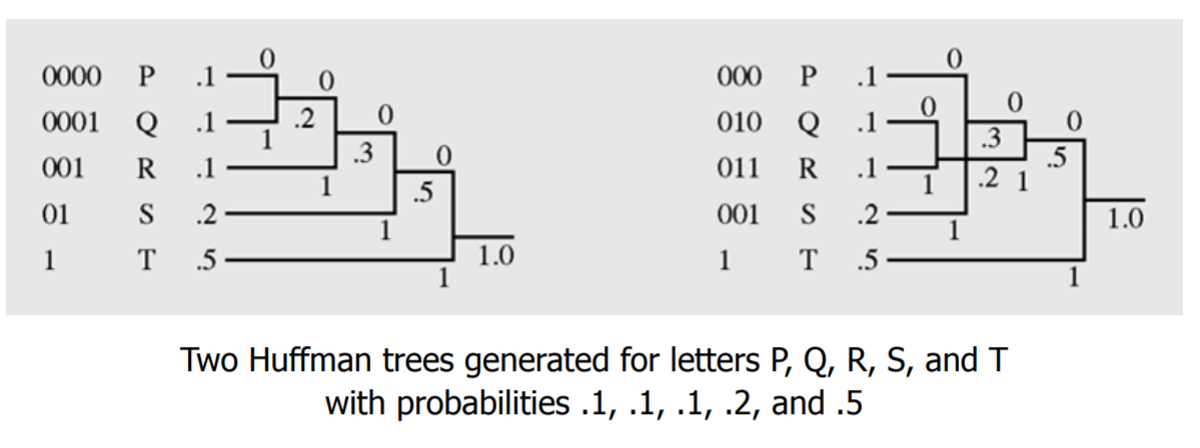
- 이것은 다르게 만든 트리인데 결과(prefix code)는 다르나 압축률은 같아진다.
4. Run-Length Encoding
-
Huffman 인코딩과 같이 무손실 압축 코딩에 또 다른 알고리즘
- 런(run)은 동일한 문자가 하나 혹은 그 이상 연속해서 나오는 것을 의미한다. 예 를 들어 스트링 s = “aaabba”는 다음과 같은 3개의 run으로 구성된다: “aaa”, “bb”, “a”.
- run-length encoding에서는 각각의 run을 그 “run을 구성하는 문자”와 “run의 길이”의 순서쌍 (n, ch)로 encoding한다. 여기서 ch가 문자이고 n은 길이이다. 가령 위의 문자열 s는 다음과 같이 코딩된다: 3a2b1a.
- Run-length encoding은 길이가 긴 run들이 많은 경우에 효과적이다.
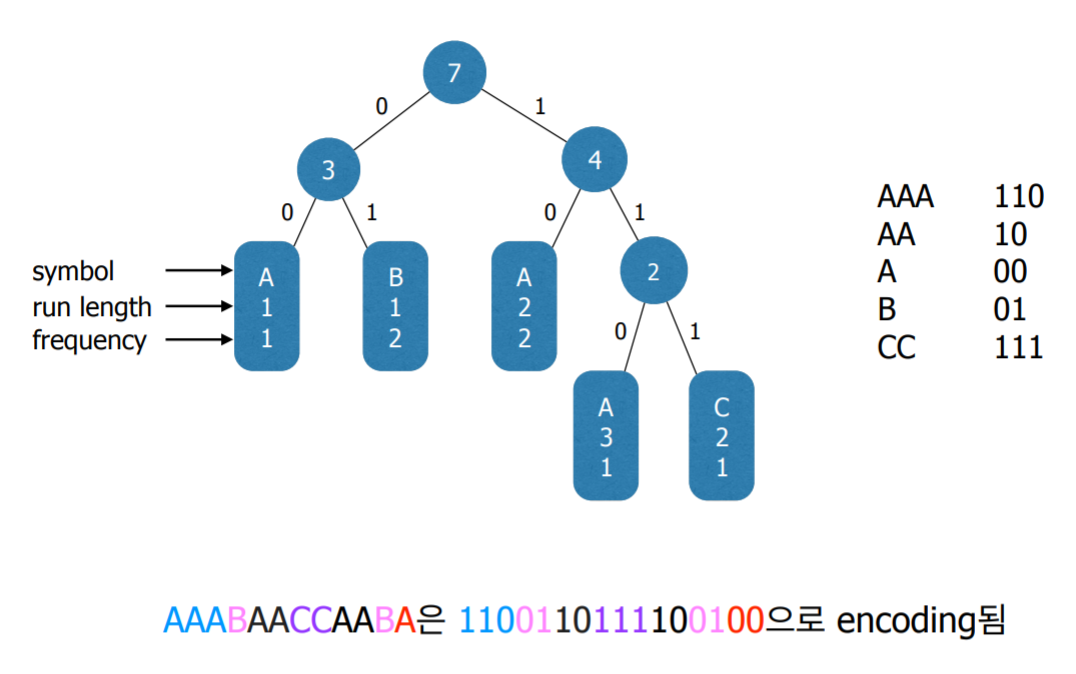
5. Huffman Method with Run-Length Encoding
- 파일을 구성하는 각각의 run들을 하나의 super-symbol로 본다. 이 supersymbol들에 대해서 Huffman coding을 적용한다.
- 예를 들어 문자열 AAABAACCAABA은 5개의 super-symbol들 AAA, B, AA, CC, 그리고 A로 구성되며, 각 super-symbol의 등장횟수는 다음과 같다.

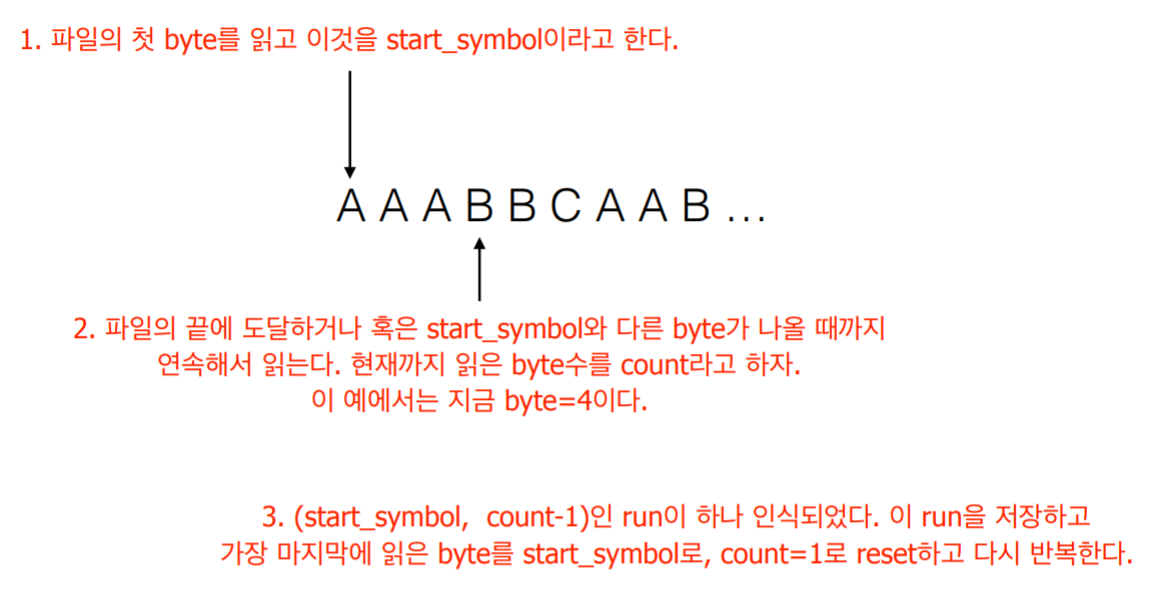
6. 구현 1단계 : Run과 frequency 찾기
- 압축할 파일을 처음부터 끝까지 읽어서 파일을 구성하는 run들과 각 run 들의 등장횟수를 구한다.
- 먼저 각 run들을 표현할 하나의 클래스 class Run을 정의한다. 클래스 run은 적어도 세 개의 데이터 멤버 symbol, runLen, 그리고 freq를 가져야 한다. 여기서 symbol은 byte타입이고, 나머지는 정수들이다.
- 인식한 run들은 하나의 ArrayList에 저장한다.
-
적절한 생성자와 equals 메서드를 구현한다.
- 데이터 파일을 적어도 두 번 읽어야 한다. 한 번은 run들을 찾기 위해서, 그리고 다음은 실제로 압축을 수행하기 위해서.
- 여기서는 RandomAccessFile을 이용하여 데이터 파일을 읽어본다.
/* 읽을 데이터 파일을 연다 */
RandomAccessFile fIn = new RandomAccessFile(fileName,”r”);

/* 한 byte를 읽어 온다. 읽어온 byte는 0~255사이의 정수로 반환된다. */
/* 파일의 끝에 도달하면 -1을 반환한다. */
int ch = fIn.read();

/* byte로 casting해서 저장한다 */
byte symbol = (byte)ch;
6.1 Run 인식하기
class Run {
    public byte symbol;
    public int runLen;
    public int freq;
    /* 적절한 생성자와 equals 메서드를 완성하라. */
}

public class HuffmanCoding {
    /* 인식한 run들을 저장할 ArrayList를 만든다 */
    private ArrayList<Run> runs = new ArrayList<Run>();

    private void collectRuns(RandomAccessFile fIn) throws IOException {
        /* 데이터 파일 fIn에 등장하는 모든 run들과 각각의 등장횟수를 count하여 */
        /* ArrayList runs에 저장한다. */
    }

    static public void main (String args[]) {
        HuffmanCoding app = new HuffmanCoding();
        RandomAccessFile fIn;
        try {
            fIn = new RandomAccessFile(“sample.txt”,”r");
            app.collectRuns(fIn);
            fIn.close();
        } catch (IOException io) {
            System.err.println("Cannot open " + fileName);
        }
	}
}
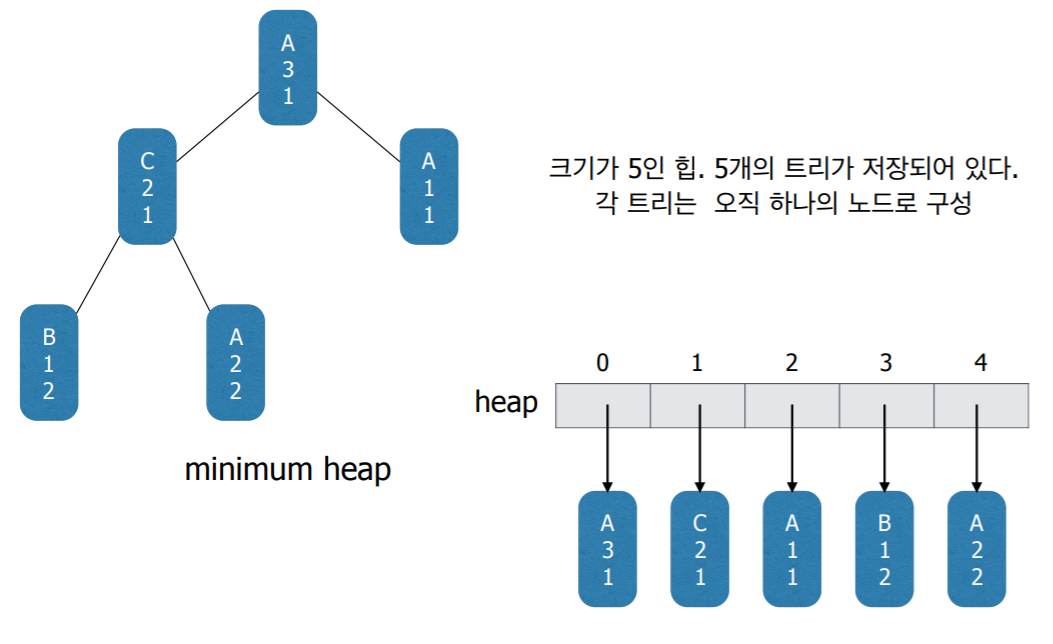
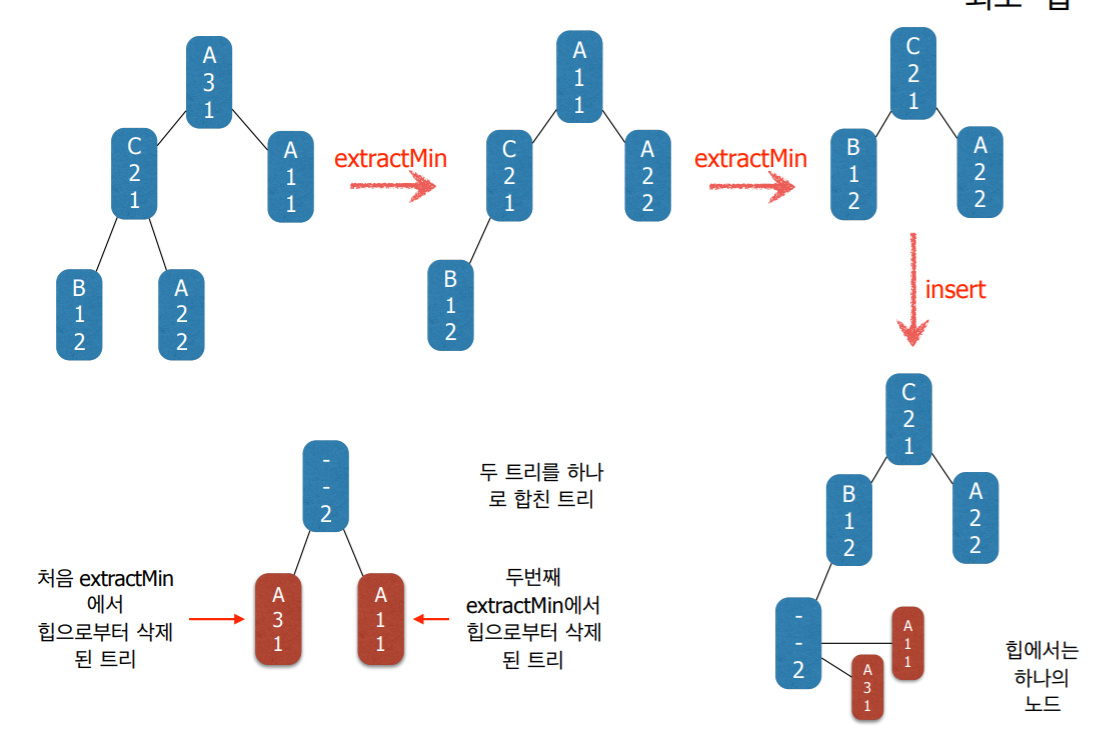
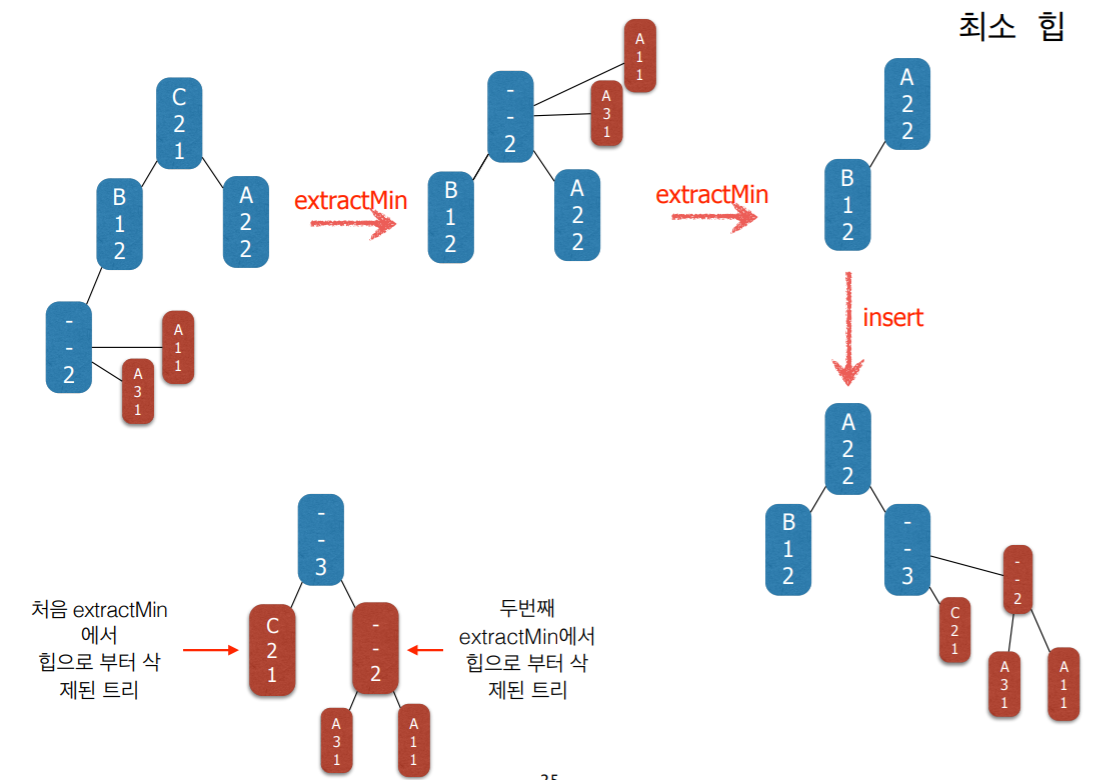
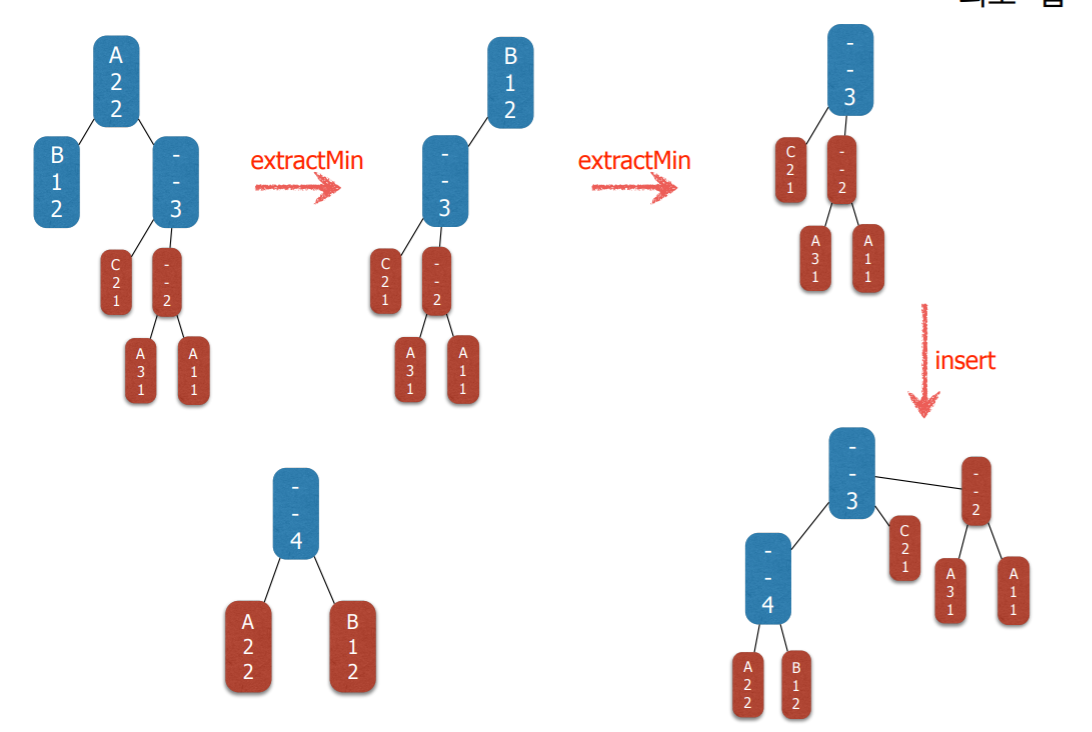
7. 구현 2단계 : Huffman Tree
- Huffman coding 알고리즘은 트리들의 집합을 유지하면서
- 매 단계에서 가장 frequency가 작은 두 트리를 찾아서 두 트리를 하나로 합친다.
- 이런 연산에 가장 적합한 자료구조는 최소 힙(minimum heap)이다.
- 즉 힙에 저장된 각각의 원소들은 하나의 트리이다 (노드가 아니라).
class Run implements Comparable<Run> {
public byte symbol;
public int runLen;
public int freq;
/* 트리의 노드로 사용하기 위해서 왼쪽 자식과 오른쪽 자식 노드 필드를 추가한다. */
/* 두 run의 크기관계를 비교하는 compareTo 메서드를 overriding하라. */
/* 비교의 기준은 freq이다. */
}
public class HuffmanCoding {
private ArrayList<Run> runs = new ArrayList<Run>();
private Heap<Run> heap; /* minimum heap이다. */
private Run theRoot = null; /* root of the Huffman tree */
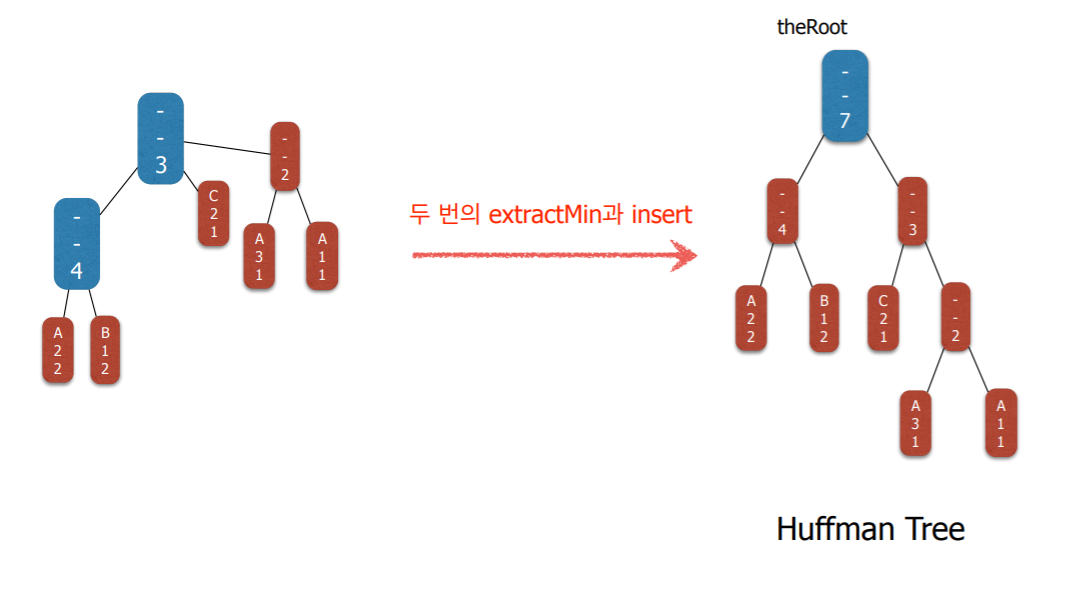
private void createHuffmanTree() {
heap = new Heap<Run>();
/* 1. store all runs into the heap. */
/* 2. while the heap size > 1 do */
/* (1) perform extractMin two times */
/* (2) make a combined tree */
/* (2) insert the combined tree into the heap. */
/* 3. Let theRoot be the root of the tree. */
}
private void printHuffmanTree() {
preOrderTraverse(theRoot, 0);
}
private void preOrderTraverse(Run node, int depth) {
for (int i=0; i<depth; i++)
System.out.print(“ ");
if (node == null) {
System.out.println(“null”);
} else {
System.out.println(node.toString());
preOrderTraverse(node.left, depth + 1);
preOrderTraverse(node.right, depth + 1);
}
}
}
8. 구현 3단계 : Codeword 부여하기
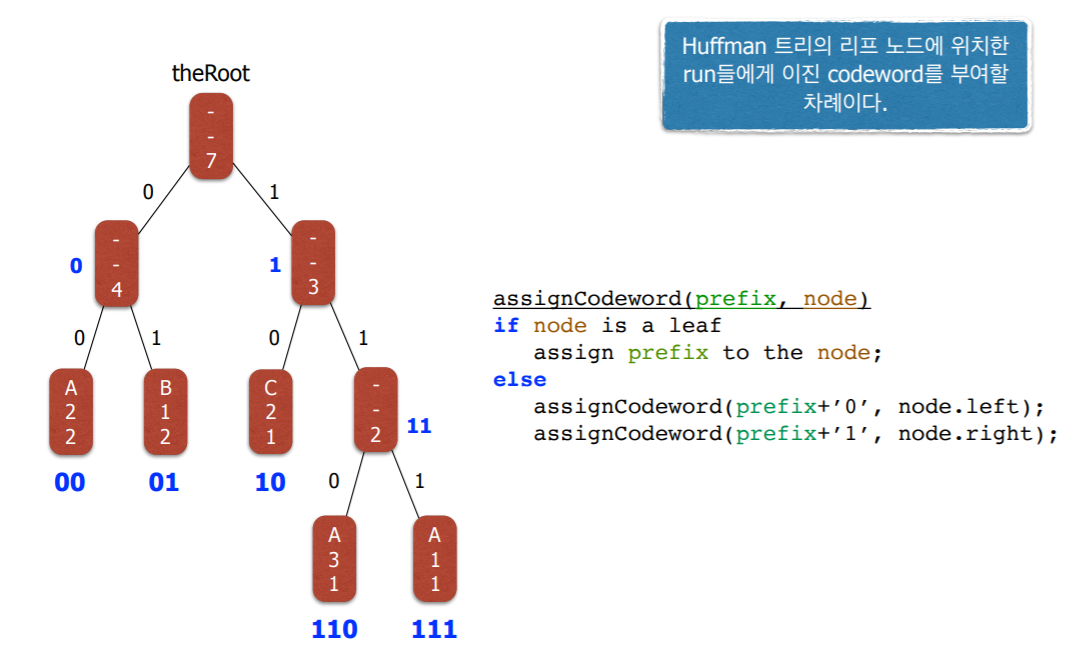
- Recursion 하게 구현가능
- 여기서 prefix를 하나의 32비트 정수로 표현한다.
- 하지만 32비트 중에 서 하위 몇 비트만이 실제 부여된 codeword이다.
- 따라서 codeword의 길이를 따로 유지해야 한다.
class Run implements Comparable<Run> {
    public byte symbol;
    public int runLen;
    public int freq;

 /* 트리의 노드로 사용하기 위해서 왼쪽 자식과 오른쪽 자식 노드 필드를 추가한다. */
 /* 노드에 부여된 codeword를 저장하기 위한 필드들을 다음과 같이 추가한다. */

    public int codeword; 	/* 부여된 codeword를 32비트 정수로 저장 */
    public int codewordLen; /* 부여된 codeword의 길이. 즉 codeword의 */
 							/* 하위 codewordLen비트가 실제 codeword */

    public Run(byte s, int r){
        symbol = s;
        runLen = r;
        freq = 1;
    }
}
- 비트 연산 테스트
public class Test {
     public static void main(String args[]) {
         int a = 60; /* 60 = 0011 1100 */
         int b = 13; /* 13 = 0000 1101 */
         int c = 0;

         c = a & b; /* 12 = 0000 1100 */
         System.out.println("a & b = " + c );

         c = a | b; /* 61 = 0011 1101 */
         System.out.println("a | b = " + c );

         c = a ^ b; /* 49 = 0011 0001 */
         System.out.println("a ^ b = " + c );

         c = a << 1; /* 120 = 0111 1000 */
         System.out.println("a << 1 = " + c );

         c = (a << 1) + 1; /* 121 = 0111 1001 */
         System.out.println(“(a << 1) + 1 = " + c );
     }
}
- a « 1이 0이 붙는 codeword이고 (a « 1) +1이 1이 붙는 codeword이다.
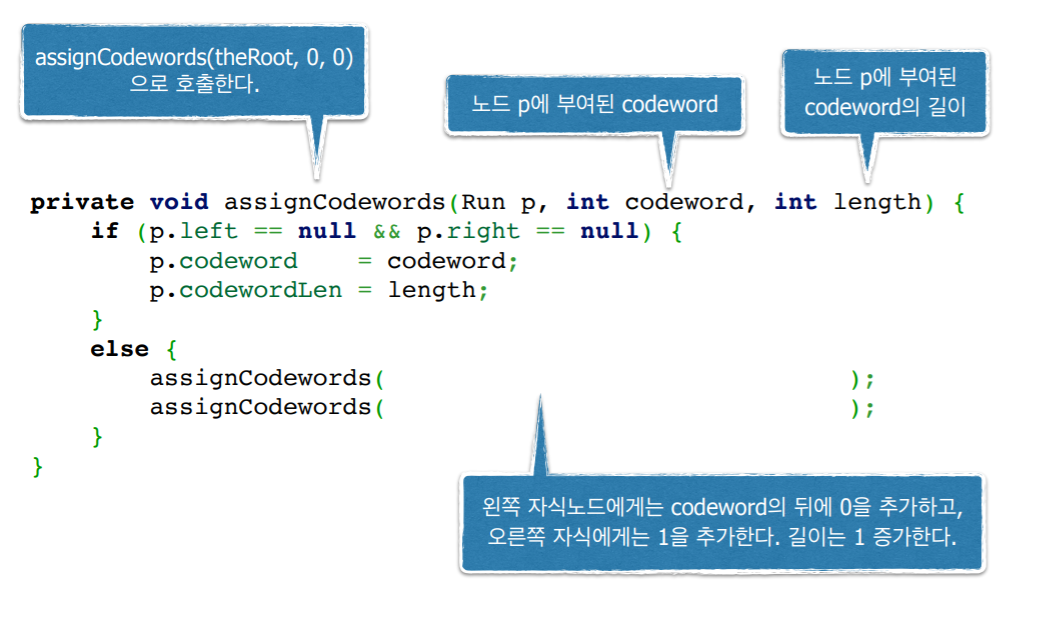
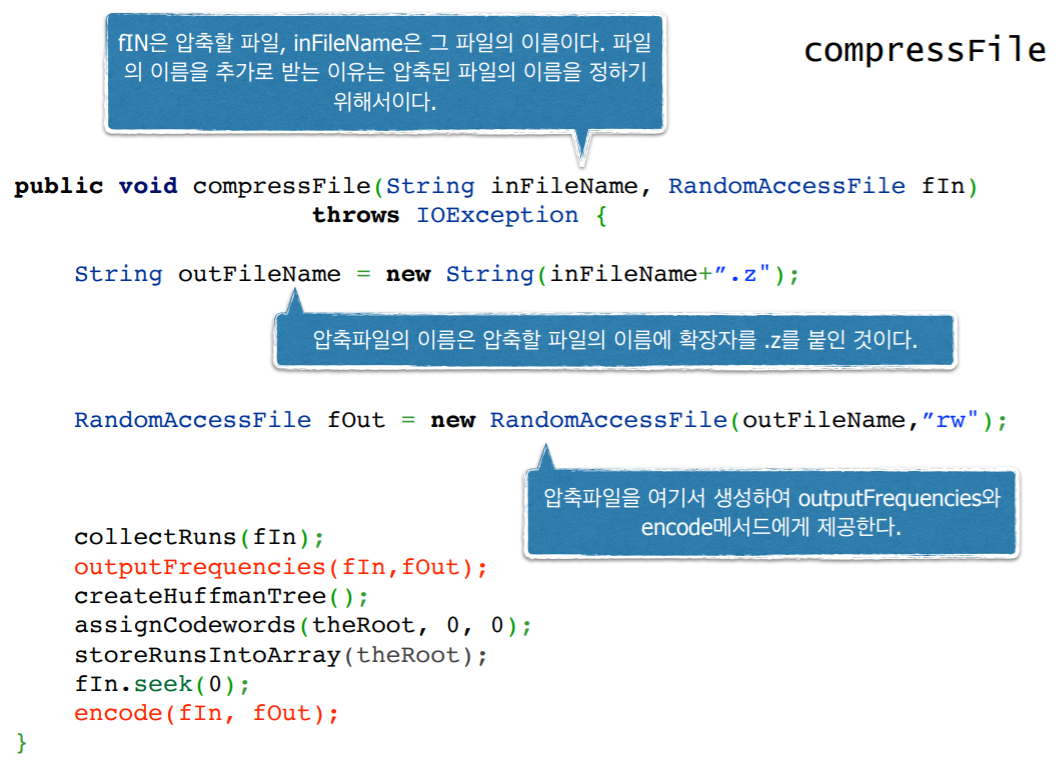
7.1 Codeword Pseudo Code
public class HuffmanCoding {

    public void compressFile(RandomAccessFile fIn) {
        collectRuns(fIn);
        createHuffmanTree();
        assignCodewords(theRoot, 0, 0);
    }

    static public void main (String args[]) {
        HuffmanCoding app = new HuffmanCoding();
        RandomAccessFile fIn;

        try {
        	fIn = new RandomAccessFile(“sample.txt”,”r");
        	app.compressFile(fIn);
        	fIn.close();
        } catch (IOException io) {
       		System.err.println("Cannot open " + fileName);
        }
    }
}
8. 제 4단계 : Codeword 검색하기
- 데이터 파일을 압축하기 위해서는 데이터 파일을 다시 시작부터 읽으면서 run을 하나씩 인식한 후 해당 run에 부여된 codeword를 검색한다.
- Huffman트리에는 모든 run들이 리프노드에 위치하므로 검색하기 불편하다.
- 검색하기 편리한 구조를 만들어야 한다.
-
java의 hashset은 get 메서드를 제공하지 않으므로 이런 목적으로 사용하기 어렵다.
- HashMap의 Key는 (symbol, runLenth)이고 value는 (codeword, codewordLenght)이다.
- 이미 만들어 놓은 run 객체들을 key와 value로 동시에 사용하자.
-
즉, HashMap<Run, Run>을 사용한다.
- HashMap을 만들고 모든 run들을 저장한다.
HashMap<Run, Run> map = new HashMap<Run, Run>();
for each run p in Huffman tree do
    map.put(p, p);
- 데이터 파일을 읽으면서 인식한 각각의 (symbol, length)에 대해서 다음과 같이 codeword를 검색할 수 있다.
Run p = map.get(new Run(symbol, length));
Use the codeword in p;
private HashMap<Run, Run> map = new HashMap<Run, Run>();

private void storeRunsIntoHashMap(Run p) {
	/* huffman 트리의 모든 리프노드들을 map에 recursion으로 put한다. */
}

public void compressFile(RandomAccessFile fIn) {
    collectRuns(fIn);
    createHuffmanTree();
    assignCodewords(theRoot, 0, 0);
    storeRunsIntoHashMap(theRoot); // 추가
}
- HashCode로 생성한 run을 가지고 map에 같은 객체가 있는지 확인 하기 위해서는 class Run에 hashCode를 overriding해서 사용해야 한다. 안 그러면 같은 Symbol과 length가 map이 있지만 기존의 hashCode를 사용하면 객체의 hashCode가 다르기 때문에 찾을 수가 없다.
class Run implements Comparable<Run> {

    public int hashCode() {
        return (int) symbol + runLen;
    }
}
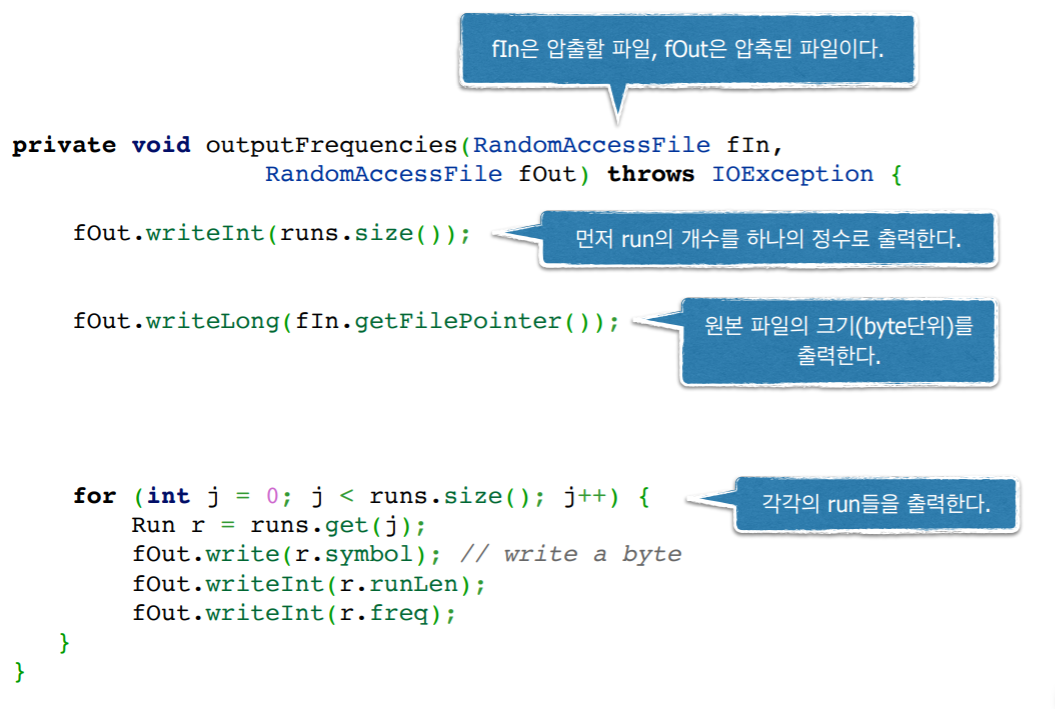
9. 제 5단계 : 인코딩하기
- 압축파일의 맨 앞부분(header)에 파일을 구성하는 run들에 대한 정보를 기록한다.
- 이때 원본 파일의 길이도 함께 기록한다 (왜 필요할까?)
- 디코딩 할때 남는 길이를 위해 padding으로 넣은 비트들을 알기 위해서 원본 파일 길이도 함께 기록
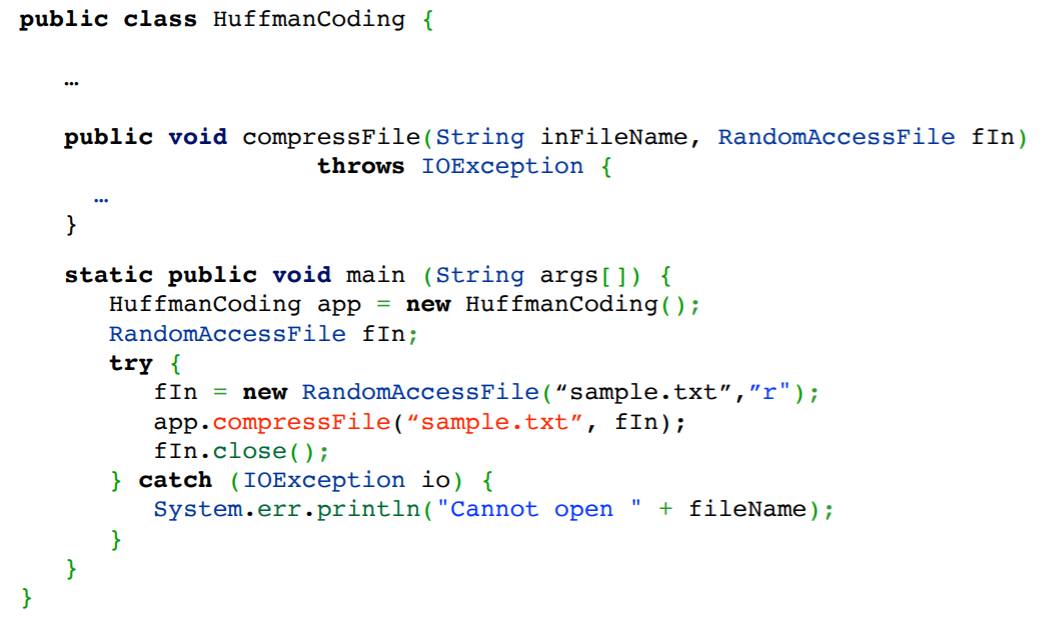
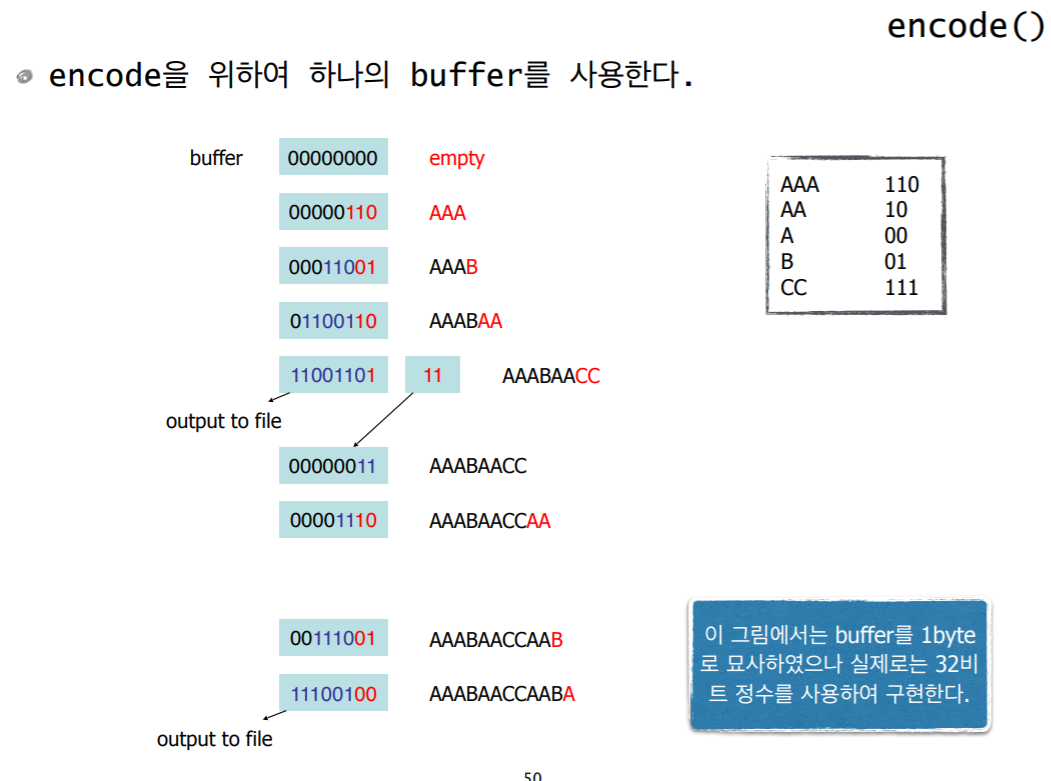
private void encode(RandomAccessFile fIn, RandomAccessFile fOut) {
    while there remains bytes to read in the file {
        recognise a run;
        find the codeword for the run;
        pack the codeword into the buffer;
        if the buffer becomes full
            write the buffer into the compressed file;
    }
    if buffer is not empty {
        append 0s into the buffer;
        write the buffer into the compressed file;
    }
}

public class HuffmanEncoder {
    static public void main (String args[]) {
        String fileName = "";
        HuffmanCoding app = new HuffmanCoding();
        RandomAccessFile fIn;
        Scanner kb = new Scanner(System.in);

        try {
            System.out.print("Enter a file name: ");
            fileName = kb.next();
            fIn = new RandomAccessFile(fileName,"r");
            app.compressFile(fileName,fIn);
            fIn.close();
        } catch (IOException io) {
            System.err.println("Cannot open " + fileName);
        }
    }
}
10. 제 6단계 : 디코딩하기
public class HuffmanDecoder {
    static public void main (String args[]) {
        String fileName = "";
        HuffmanCoding app = new HuffmanCoding();
        RandomAccessFile fIn;
        Scanner kb = new Scanner(System.in);

        try {
            System.out.print("Enter a file name: ");
            fileName = kb.next();
            fIn = new RandomAccessFile(fileName,"r");
            app.decompressFile(fileName,fIn);
            fIn.close();
        } catch (IOException io) {
            System.err.println("Cannot open " + fileName);
        }
    }

    public void decompressFile(String inFileName, RandomAccessFile fIn)
        throws IOException {
        String outFileName = new String(inFileName+".dec");
        RandomAccessFile fOut = new
        RandomAccessFile(outFileName,"rw");
        inputFrequencies(fIn);
        createHuffmanTree();
        assignCodewords(theRoot,0,0);
        decode(fIn,fOut);
    }

    private void inputFrequencies(RandomAccessFile fIn) throws IOException {
        int dataIndex = fIn.readInt();
        sizeOriginalFile = fIn.readLong();
        //이 메서드가 속한 class HuffmanCoding에 long타입의 변수 sizeOriginalFile을 멤버로 추가한다. 이것은 원본 파일의 길이다. 이 값은 decode메서드에서 사용된다.
        runs.ensureCapacity(dataIndex);

        for (int j = 0; j < dataIndex; j++) {
            Run r = new Run();
            r.symbol = (byte) fIn.read();
            r.runLen = fIn.readInt();
            r.freq = fIn.readInt();
            runs.add(r);
        }
    }

    private void decode(RandomAccessFile fIn, RandomAccessFile fOut) throws IOException {
        int nbrBytesRead=0, j, ch, bitCnt = 1, mask = 1, bits = 8;
        mask <<= bits - 1; // change 00000001 to 100000000

        for (ch=fIn.read(); ch!=-1 && nbrBytesRead<sizeOriginalFile;) {
            Run p = theRoot;

            while(true) {
                if (p.left == null && p.right == null) {
                    for (j = 0; j < p.runLen; j++)
                        fOut.write(p.symbol);
                    nbrBytesRead += p.runLen;
                    break;
                }
                else if ((ch & mask) == 0) /* if the most significant bit is 0 */
                    p = p.left;
                else /* if the most significant bit is 1 */
                    p = p.right;
                if (bitCnt++ == bits) { /* if done with the current byte */
                    ch = fIn.read();
                    bitCnt = 1;
                }
                else
                    ch <<= 1; /* left-shift the current byte */
            }
        }
    }
}